Quantcast
Channel: Sweeten
Viewing all 1836 articles
Browse latest View live

When Do You Need an Architect?

$
0
0

From stamping approvals to full service, the role (and cost) of architects

architect fees

As you begin planning your renovation, the question of whether or not you need an architect will inevitably arise. Typically, if your project is a whole-home project, a gut renovation, or involves moving walls, you will need to hire an architect. In this scenario, the architect will likely help you fill out the rest of your team, including your general contractor. Given the scale of these types of projects, the money you spend on an architect is well worth it: not only is there someone who project-manages the renovation from start to finish, s/he is trained to create an optimal and thoughtful design to suit your lifestyle.

But sometimes, you’ll need an architect for just one part of your project—say, your building requires schematic designs by a registered architect (RA), and you’re doing a fairly small bathroom project. How much can you expect to pay for stand-alone services?

Here, Sweeten, a free service matching homeowners with vetted contractors AND architects, lays out the full details on what services architects offer and how much you should expect to pay.

architect fees
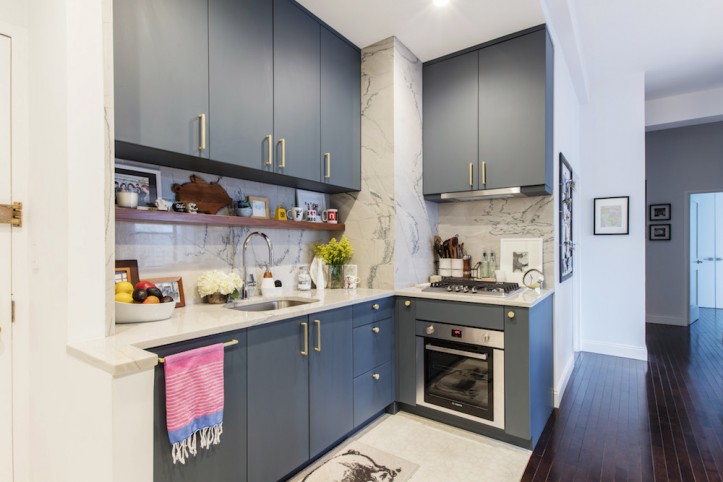
(Above) These Sweeten homeowners used architects: Marsha and Adam’s townhouse, Deniz and Ramon’s kitchen, and Amber and Chris’ bedroom addition

What you’ll get

When you hire an architect, you can opt for a full suite of services. This includes the following:

architect fees

What you’ll pay

That sounds great, you say! But how much will it cost? For residential renovations, architects typically charge a percentage of the construction cost of a project. In major urban areas like New York City, this is typically between 15-20 percent for a project costing around $20,000-$30,000. Very large or costly projects budgeted above $250,000 or more can sometimes be billed at a lower percentage, between 10-15 percent. Sweeten architect Andrew, who has done projects in Pennsylvania, Florida, and New York State, tells us that in areas outside of the city but with a close relationship to it—say upstate or in the Hamptons—the costs are essentially the same, give or take a percentage or two.

When it comes to fees, such as permit or application fees, they are either required fixed fees or are based on the cost of construction. Andrew says these vary based on location but in general, once a project is under construction, additional fees might be paid to the Department of Buildings. Expect a fee if changes are made to the plans and the application needs to be amended or if the construction time needs to be extended, he explains.

The cost of an expediter is often minimal when working with the Department of Buildings in towns outside city limits (you don’t usually need one). According to Andrew, it’s not uncommon to be able to walk into the buildings department of smaller towns and obtain the information you’re looking for without an expediter.

While some architects may charge a fixed rate, an hourly rate, or a cost per square foot, these fee structures are less common for full-service residential renovation projects.

Can I buy standalone services?

There are certain situations where you need select architectural services, but where it doesn’t make sense to pay for the full package. In these cases, select services may be offered by some architects, while many architects will prioritize projects where they will be involved from start to finish.

For those who are willing to provide one-off services, you will typically work out an hourly billing arrangement. Depending on their experience and seniority, their hourly rate will range between $100 to $150 for a project manager to $175 to $250 for a principal RA. You can also request a cap on the hourly rate if you want to make sure to stay within budget.

One Sweeten architect, Jiwoo, tells us that while he typically works on full-service renovations, he will sometimes draw up the concept and schematic design required for a project to obtain board approval. In a case like this, he estimates that he will bill for about 20 hours at his hourly rate. Another Sweeten architect, Slavica, says that an initial site visit and walk-through—to determine whether or not what the homeowner envisions is possible, for example—will be billed at about 2 to 5 hours.

Generally, architects may be willing to provide one-off services in the categories under Planning and Development, Permits and Approvals, and Interior Design (see chart above). It’s typically too complicated and costly to offer Project Management services by the hour.

Whether you have an in-depth renovation or need a set of plans to be drawn up and stamped for approval, an architect will be an important part of your renovation team. If you’re ready to hire an architect for your project, Sweeten can help! To get started, fill out a project post here.

When it was time to renovate their own homes, these five architects came to Sweeten to find their general contractors.

Refer your renovating friends to Sweeten and you’ll both receive a $250 Visa gift card when they sign a contract with a Sweeten general contractor.

Sweeten handpicks the best general contractors to match each project’s location, budget, and scope, helping until project completion. Follow the blog for renovation ideas and inspiration and when you’re ready to renovate, start your renovation on Sweeten.

The post When Do You Need an Architect? appeared first on Sweeten Blog.


A New Jersey Kitchen Embraces a Narrow Footprint

$
0
0

A gut remodel maxes out a railroad-style cook space

New Jersey kitchen renovation

Project: Refresh a kitchen in Jersey City, NJ

Before: Kate and Matt loved their Jersey City neighborhood with the park across the street from their 1870s building. Nevertheless, after seven years of marriage, they knew what did and didn’t work in their kitchen floor plan, and decided it was high time for a makeover. Cheap ‘80s-era cabinets were showing their age, and storage was bursting at the seams, creating a chaotic pileup on every surface. While the kitchen is indisputably the heart of the home, when it literally falls in the middle of a living space (often referred to as railroad-style), it takes some serious planning to make the space fully functional.

The cook space was serviceable but worn. Kate had lived in the condo since 2000 and was more than weary of the laminate-clad cabinets and counters and the 30-year-old appliances. The kitchen’s location, in the middle of the apartment, dictated the galley setup. A massive soffit further encroached on the wall space, limiting storage.

New Jersey kitchen renovationNew Jersey kitchen renovation

After: Kate’s primary objective, besides a completely new look, was the addition of a breakfast bar. “I spend a lot of time in the kitchen cooking,” she said, “so I really craved a little spot in which to sit.” She posted her project on Sweeten, a free service matching renovators with vetted general contractors, and chose her Sweeten contractor.

New Jersey kitchen renovation

Kate knew she wanted gray cabinets but worried the kitchen, which had no windows, might still be dark. So she countered with lighter materials for all the other surfaces—white quartz countertops, a white subway tile backsplash, and a pale wood breakfast bar. Her budget didn’t include money for new light fixtures, so she found brighter LED bulbs for the recessed ceiling lights. “That made a big difference.”

Her contractor saw an opportunity to move the refrigerator a few feet over from its original corner location, to allow storage on either side, while breaking up the monotony of a long run of cabinets. In addition, he moved the placement of the new dishwasher (an 18-inch version that Kate scored from Craigslist) from the left of the sink to the right, permitting roomier, deeper drawers to the right of the range, where they were needed.

New Jersey kitchen renovationNew Jersey kitchen renovation

As for Kate’s breakfast bar, the galley layout proved less of an obstacle than she thought. After discussing several scenarios, she and her Sweeten contractor settled on a location at the far end of the kitchen, above the stairs. Matt and Kate wondered about things falling off the ledge to the floor below, particularly from the swipe of a paw from their tabby, George. A raised back to the bar was added at her contractor’s recommendation to inhibit the antics of a capricious cat. He also inserted a diagonal base cabinet between the range and the cabinet abutting the breakfast bar. “I worried I’d be constantly bumping into sharp corners,” said Kate, “but the diagonal unit made everything flow together.”

New Jersey kitchen renovationNew Jersey kitchen renovation

Another concern was whether her budget was enough for everything she wanted. Her contractor advised her on which materials to choose so she wouldn’t overspend. Now, with plenty of cabinets to store cooking gear, and loads of counter space, there’s a place for everything and everyone, including George, who also likes to sit at the breakfast bar.

Bonus: When the time came to gut the kitchen, her Sweeten general contractor made a marvelous discovery. The soffits, which consumed so much upper wall space, were empty. This meant they could be removed, and taller upper cabinets installed, greatly increasing storage capacity. “It just opened up the room,” said Kate. “It feels more spacious and brighter at the same time.”

Style finds: Cabinets: Custom. Cabinet hardware: Home Depot. Refrigerator: LG. Range, microwave: GE. Dishwasher: Bosch (found on Craigslist). Sink, faucet: Kohler.

New Jersey kitchen renovationNew Jersey kitchen renovationNew Jersey kitchen renovation

Learn more about the steps involved in renovating your kitchen—and how long the overall process will take—in our guide.

Refer your renovating friends to Sweeten and you’ll both receive a $250 Visa gift card when they sign a contract with a Sweeten general contractor.

Sweeten handpicks the best general contractors to match each project’s location, budget, and scope, helping until project completion. Follow the blog for renovation ideas and inspiration and when you’re ready to renovate, start your renovation on Sweeten.

The post A New Jersey Kitchen Embraces a Narrow Footprint appeared first on Sweeten Blog.

A Creative Home to Call Their Own

$
0
0

A couple’s clever path to a larger, more personal space

When Aimee and B made a move to upgrade to a 3-bed, 2-bath (formerly 1-bath) co-op in Park Slope, they weren’t sure if they needed a contractor, an architect, an interior designer, or all of the above. The kitchen was “more or less non-existent” and the bath needed a re-do. Essential changes, including moving walls and emphasizing the home’s architectural character, gave way to their welcoming new space. Read on for details of their renovation adventure.

renovation Brooklyn
Guest post by Park Slope homeowner Aimee

My wife B and I loved our little one-bedroom duplex in Hell’s Kitchen, but it had two drawbacks. It was small and the little spiral staircase was a safety hazard that we suspected would only get worse as we got older. Our budget was tight for the 2-bedroom, 2-bathroom apartment we wanted, but we felt like it was time to make the move.

Focusing on Park Slope, we found one apartment that wasn’t perfect, but it had enough space, so we put in an offer. We lost out to a higher bid. We found a second apartment that had a cute little balcony, but we were outbid again. It became clear that we needed to look at apartments below our budget so we could bid higher, but there wasn’t much in that range.

Finally, I expanded my search to include places with only ONE bathroom, and saw an apartment pop up that fit our budget—the listing said, “Bring your contractor.” It was a big mess, but at least it was big! I rushed to an early open house on a Wednesday morning so I could be one of the first to see it. As I left, I texted B, “It needs a lot of work, but it just feels like home.” She came back with me that Sunday and was equally smitten with the place. We had to outbid 11 other offers, but this time, we got it!

renovation Brooklyn

renovation Brooklynrenovation Brooklyn
(Before) The study (left) and the hallway (right) leading to the living roomSWEETEN_AimeeWalker_Apt14
(After) Living room and study (right)

The 3-bedroom, 1-bathroom (now 2-bathroom) co-op is on the 2nd floor of a brownstone building in the center of Park Slope. The bathroom was in desperate need of an update, and the kitchen was more or less non-existent (there were a few cabinets and a sink). We knew this would be a lot of work, but didn’t know if we needed an architect, a contractor, a designer, or all of the above. We spoke to a few of each and no one thought they could do all the work we needed for anywhere close to our budget.

After seeing Sweeten on Open House NYC, we finally posted our project on Sweeten and were matched with a contractor who could guide us with design and connect us to an architect. Since we wanted to renovate the kitchen and bathroom before moving in, we decided to take the plunge and do a full renovation on the whole apartment, including installing new 5″ oak floors in a cherry stain, replacing crumbling plaster walls with drywall, and adding a washer/dryer in the hallway closet.

renovation Brooklynrenovation Brooklyn

We didn’t have a specific style in mind for the remodel, though we wanted to save as many of the original features as possible. Both of us loved the sense of history in the home, and while a few modern lights were OK with us, we didn’t want to clash too much with the original look. So we saved the molding that was salvageable and picked new ones that matched as closely as possible. We managed to save the vast majority of the tin ceiling—a small section was ruined when we moved the wall between the rear bedrooms. The exposed brick walls and the Deco-style fireplace in our living room were also kept intact (we gave the fireplace a fresh coat of paint). Sadly, we weren’t able to save the beautiful french doors, but one now hangs horizontally on the living room wall as a piece of art.

renovation Brooklyn

Beyond matching the existing style, we wanted an apartment that felt cozy and creative. For me, as a writer, that meant lots of space for books. The existing small study, where one of the two doorways was removed and a transom was added, was the perfect spot for our collection. It offered me a place to write and work that felt totally stuffed with books. The writer in me also loved the bay window. Back when I first walked into the apartment, during the open house, I could already envision the banquette that could be built underneath the three windows, allowing us to lounge along the windows and read. Sitting curled up on that bench with a book is now one of my favorite activities. As an added bonus, it also gives us extra storage.

renovation Brooklyn(Before) Kitchenrenovation Brooklynrenovation Brooklyn

The kitchen was probably the biggest transformation. While we kept the room in basically the same spot, everything else changed. The only appliance in the kitchen when we bought the place was a small, cheap stove that the sellers brought in for the inspection. There was also a small sink and a few metal cabinets, all on the righthand wall when you faced the kitchen. Very little demo was needed in there!

We spoke with our contractor extensively about what we wanted—as large a kitchen as would fit in the space, and as open as possible. He was able to give us a 3D rendering that included all the elements we required—a large peninsula for bar stools, ample storage space including deep drawers for our pots and pans, and the triangular configuration for our stove, sink, and fridge.

renovation Brooklynrenovation Brooklyn

We tried to bring in our “cozy and creative” feel through the fixtures and furniture. Our contractor sourced most of our materials, other than the lighting and appliances, so we had time to focus on finding just the right accent pieces. Our favorite store in Hell’s Kitchen, Domus, was a great resource for items like our bedspread and picture frames.

renovation Brooklyn
(Before) Master bedroom (left) and the wall on the right that was removed to enlarge the space; guest bedroom (right), formerly the masterrenovation Brooklyn
(Above) Guest bedroomrenovation Brooklyn
(Above) Master bedroomSWEETEN_AimeeWalker_Apt05

Our Sweeten contractor helped us to figure out the best layout in the apartment. Since we were putting in a second bathroom, we wanted to create a master bedroom that was ensuite, but we weren’t quite sure how to make that happen, including annexing some hallway space. Ultimately, a wall was removed between the two rear bedrooms so the master would be next to the large walk-in closet. That closet became the master bath and a new clothes closet was built.

renovation Brooklyn
(Before) Guest bathrenovation Brooklyn
(Above) Guest bathrenovation Brooklyn
(Above) Master bathrenovation Brooklyn

Though we love the end result, the renovation process took a lot longer than we had originally hoped, partly due to waiting for city permits, some changes to our original plan, and to the general busy schedule of our contractor. We were able to stay in our old apartment for quite a while because we had low carrying costs, and held off selling it as long as possible. When we finally put our old place on the market, it sold quickly and we moved into the new place with only a few weeks’ notice.

Our contractor’s team was able to get it to a “move-in ready” state in time for our move, but we realized that our idea of move-in ready was different from theirs. The floors were dry enough to put our furniture down, but none of the kitchen appliances worked. We had one functioning toilet with the only working sink in the kitchen. B and I had an interesting few weeks of making ramen with our coffee maker and eating tuna out of a pouch.

In the end, that little rough patch just made us appreciate our wonderful new kitchen and the whole apartment even more. And we are still thrilled about all the little details that make this apartment uniquely ours.

Thank you, Aimee and B, for sharing your very comfortable home!

KITCHEN RESOURCES: Cabinets, 750 Series in Stone Grey: Waypoint. Solid White quartz countertops: MSI. Sink, #KHU101-23: Kraus. Simplice faucet: Kohler. Profile refrigerator, stove, dishwasher, microwave: GE. Dark grey, 6″x24″ floor tile: Roca Tile. Thurman classic lighting: Lumens. Classic Metal Ball pendants: Pottery Barn. Hardware: Amerock. Tabouret navy counter stool with wood seat: Overstock.

MASTER BATHROOM RESOURCES: HydroRail shower fixtures: Kohler. Toledo sink and vanity: Fairmont Designs. Langford cross-handle sink fixtures: Pottery Barn. Memoirs Stately round front toilet: Kohler. Benchwright Triple Sconce in antique bronze: Pottery Barn. Medicine cabinet: Ronbow.

SECOND BATHROOM RESOURCES: HydroRail shower fixtures: Kohler. Classic Single Sink Mini Console in gray: Pottery Barn. Langford cross-handle sink fixtures: Pottery Barn. Memoirs Stately elongated toilet: Kohler. Benchwright Triple Sconce in polished nickel: Pottery Barn. Medicine cabinet: Ronbow. Greenhow Blue paint, #CW-655: Benjamin Moore.

LIVING ROOM RESOURCES: Classic Metal Ball Pendants: Pottery Barn. Angelica paint, #AF-665: Benjamin Moore.

HOME OFFICE RESOURCES: YOBO Lighting Antique Industrial Barn hanging pendant light with metal dome shade in matte black: Amazon. Constellation paint, #AF-540: Benjamin Moore.

Renovating your entire home is an exciting opportunity, but what does it cost? Find out in our cost guide on budgeting your renovation according to square footage.

Refer your renovating friends to Sweeten and you’ll both receive a $250 Visa gift card when they sign a contract with a Sweeten general contractor.

Sweeten handpicks the best general contractors to match each project’s location, budget, and scope, helping until project completion. Follow the blog for renovation ideas and inspiration and when you’re ready to renovate, start your renovation on Sweeten.

The post A Creative Home to Call Their Own appeared first on Sweeten Blog.

The Art of Patterns in the Kitchen

$
0
0

A fun crop of ways to make cooking more colorful

If patterns in the kitchen feel outdated to you, think again. We’ve got proof that they’re making a steady (and stylish!) comeback. From personality-filled wallpaper prints to classic tile patterns, Sweeten homeowners are playing with subtle—and some not-so-subtle—forms of contrast in the kitchen. Read on for five unique takes on pattern play.

kitchen design

Captivated by a Hygge & West design featuring orange birds on a blue background, Mollie used the wallpaper to set the tone for her kitchen’s color scheme. She also chose a playful black-and-white tile to continue the thread of whimsy from the walls to the floor.

kitchen design

Amanda designed her kitchen from the ground up after selecting a Mediterranean-inspired tile for the floor. The rest of the design was chosen to complement the one-of-a-kind flooring.

kitchen design

Rima originally chose white subway tile for her kitchen backsplash, but her friends talked her out of it. A mix of white and gray hex tile create a modern mosaic, providing a hint of contrast without going overboard.

kitchen design

After going with blue-gray cabinets in the kitchen, Ainsley extended the color scheme into the dining room with an abstract blue and white wallpaper that pairs well with the warmth of the wood furniture and flooring.

kitchen design

Looking to preserve the classic design of her prewar kitchen, Emily chose a simple black and white color scheme. For the floor, Spanish tile injects some old-world charm and ties the look together.

While gray cabinets and gold hardware set a sophisticated tone in Holly and Christian’s kitchen, a chevron marble backsplash keeps the space feeling fresh and energized.

kitchen design

With limited square footage, Nancy knew that bold colors would make her kitchen feel cramped. Instead, a fun wallpaper with a dizzying array of black dots across a white backdrop makes a lively addition.

SWEETEN_Kavi_Kitchen_Bathroom-01

In Kavi’s kitchen, the new backsplash provides plenty of drama. White subway tiles were replaced with a kaleidoscope of black, gray, and white triangular tiles for a look that’s modern and luxe.

Not ready to commit to a pattern in the kitchen? Consider testing out a bold print in the bathroom.

Refer your renovating friends to Sweeten and you’ll both receive a $250 Visa gift card when they sign a contract with a Sweeten general contractor.

Sweeten handpicks the best general contractors to match each project’s location, budget, and scope, helping until project completion. Follow the blog for renovation ideas and inspiration and when you’re ready to renovate, start your renovation on Sweeten.

The post The Art of Patterns in the Kitchen appeared first on Sweeten Blog.

A Closet Renovation Goes Modular

$
0
0

Two small closets, one big idea

modular closet

When software developer Jacob first purchased his one-bedroom co-op apartment, located on Manhattan’s Upper East Side, in 2017, there were two small closets that he knew could be combined to create a larger, more functional closet for himself and his girlfriend, Morgane. As part of an overall refresh of the home, he walks us through the process of how he tackled this aspect of the project.

modular closet
modular closetSWEETEN_JacobSachs_Apt08(Above) Jacob’s bedroom closet that combines hanging space with shelves and shoe storage

Sweeten: How did you decide on the Container Store’s Elfa System? 

Jacob: I looked at some of the other options out there but based on my budget and the size of the space, Elfa clearly made the most sense. Also, we had reached a point where the renovation was done, and within two weeks, Morgane and I would be sharing the space almost every weekend, so getting a functioning closet in quickly was a high priority.

Sweeten: Did you design the closet yourself using the online tool or did a representative help you in the store?

Jacob: A rep helped in the store, and everyone there was super helpful. Make sure to do a good job of measuring the space ahead of time! Once they know the dimensions, they will ask you several questions about your usage plans for the closet, your wardrobe, etc. After 20 minutes, they have a prototype to make adjustments to, although the initial blueprint was very close to the final design.

modular closet

modular closet(Above) Jacob’s closet blueprints

Sweeten: How did you decide what mix of elements to include (hanging space, open shelving, drawers, etc.)?

Jacob: The plan was to create a split usage space for me and Morgane. We would each get two hanging sections and two sets of shelves, and we would share a large section for shoes. One of Morgane’s hanging sections is double-height for hanging longer items. We have an enormous dresser in the bedroom, so we were able to consider the closet as a space almost exclusively for hanging and shelving.

Sweeten: What did your contractor do to prepare the space for the installation?

Jacob: Our Sweeten contractor demo’ed and combined the existing closets. He also refinished the floors and walls of the combined space. He left the space open without doors. We used the installer provided by the Container Store’s delivery contractor. It took just a few hours.

Sweeten: Why did you decide to leave the doors off?

Jacob: Before, the closet existed as two extremely small separate closets. When combined, the opening was a non-standard width for pretty much every manufacturer we looked at. There is not enough space to the side for a sliding barn door or a pocket door, and Morgane and I both find French doors or folding doors annoying to deal with. Leaving the doors off of the closet actually gave us a lot more flexibility in gaining maximum closet space.

SWEETEN_JacobSachs_Apt10

Thank you, Jacob, for sharing your closet renovation with us.

You can see Jacob’s project profile here, and if you’re considering a fully customized built-in closet, take a look at this cost guide.

As he pointed out, there are many modular options out there in addition to Elfa. California Closets is a popular one at a slightly higher price point than Elfa, while Home Depot, Lowe’s, and IKEA all have modular kits that you can customize to your liking. They are all priced per piece, so you’ll have to buy each shelf, bracket, and track separately. Each of these retailers also offers ready-made sets, however, which can give you a sense of the price range for various setups of different sizes and combinations. In-store representatives can help you tweak your design. Check out what other Sweeten homeowners have done below.

modular closet
(Above) Lauren’s closet incorporates drawers as well as hanging space, eliminating the need for a dresser (California Closets)

modular closet
(Above) A sliding door takes up minimal space in Melissa’s studio closet (California Closets)

modular closet
(Above) Melissa and Blake’s modular closet has four sections with hanging rods and pull-out drawers (IKEA)

modular closet(Above) Shelves, drawers, a hamper slot, and sections with hanging rods at various heights make up a truly custom closet for Nikkia and Daniel (IKEA)

Got more style than space? Explore our favorite closet renovations.

Refer your renovating friends to Sweeten and you’ll both receive a $250 Visa gift card when they sign a contract with a Sweeten general contractor. 

Sweeten handpicks the best general contractors to match each project’s location, budget, and scope, helping until project completion. Follow the blog for renovation ideas and inspiration and when you’re ready to renovate, start your renovation on Sweeten.

The post A Closet Renovation Goes Modular appeared first on Sweeten Blog.

An Apartment Combination with a View

$
0
0

Two units become an oasis—and include a fireplace

When the search for a 3-bedroom apartment on the Upper West Side left this homeowner disappointed, he decided to improvise. He purchased two units in a newly converted co-op building and planned to combine them, posting his project on Sweeten to find the right architect and general contractor for the job. Six months later, he had the home he’d been looking for, complete with a light-filled great room, premium appliances, and a state-of-the-art fireplace.

SWEETEN_Andrew_Apartment-01floorplan_before
The building this homeowner decided to move into had been newly converted from middle-income housing to condos. While looking for a 3-bedroom apartment, he discovered that the available units that met his criteria were too small. When he approached the building’s management to see if there were any 2-bedroom apartments that could be combined into one, he learned that none of the units were eligible because of their shared walls. Instead of giving up, he asked them to double check with their architect. The architect came back with good news; units in the F and G lines could be combined. The homeowner bought units 22F and 22G, which are both located at the end of a hallway.

The apartments had been renovated in a style that he felt was acceptable, but not as sleek of an aesthetic that he had in mind. He set his sights on creating an efficient and modern home that was highly functional without sacrificing any comfort. The apartments were to be combined at the end of the hallway and through the walls that aligned with each unit’s kitchen.

SWEETEN_Andrew_Apartment-08SWEETEN_Andrew_Apartment-09

After realizing that designating one of the two entrances as the main entrance would create an awkward flow, he purchased 50 square feet of the hallway between the apartments to build a new entryway. “It was expensive,” he said, “but worth it.” Moving the entrance to the master exposed old wiring belonging to an outdated intercom system which was apparently still in use in a few of the much older apartments in the building. My Sweeten contractor had to hire an expert in this kind of wiring to reroute it, which he deemed a nuisance but not a huge deal.

For the main living space, he envisioned an open-plan kitchen, family room, living room, and dining room that would give the space a loft-like feeling. The major elements of the renovation included opening the walls to combine the apartments and demolishing the two existing kitchens to build a completely new one. He also expanded the size and layout of the master bedroom and bathroom.

SWEETEN_Andrew_Apartment-02SWEETEN_Andrew_Apartment-07

The homeowner, who likes to cook, found out that moving the gas line in the kitchen to accommodate a Wolf gas stovetop would be too big of a challenge, so he opted for a Wolf convection stovetop, which he’s grown to love. “It’s modern, sleek, and boils a pot of water in seconds,” he said. He also wanted to convert part of one of the old kitchens into a laundry room and install stackable washer and dryer units, noting that the overall process was seamless and easy.

SWEETEN_Andrew_Apartment-16SWEETEN_Andrew_Apartment-15SWEETEN_Andrew_Apartment-11-12

In the bathroom, he wanted to create a mini spa with a walk-in shower, slate floor tile, and marble walls. One of the challenges he faced was converting the bathtub into a walk-in shower because it required raising the floor underneath for the drain pipes to meet the code requirements. He expanded the bathroom by utilizing a nearby closet, which became difficult because he was placing a wet space over a dry space, and had to move the wiring to the main electrical box to make it work.

SWEETEN_Andrew_Apartment-04 SWEETEN_Andrew_Apartment-06SWEETEN_Andrew_Apartment-03

Throughout the apartment, he wanted to incorporate interesting design and architectural lighting. The fact that the building is postwar—built in 1971—meant that he couldn’t drill into the slab. To solve this problem, he decided to drop the ceilings in most of the apartment by 4” to 6” inches to allow for recessed lighting.

SWEETEN_Andrew_Apartment-18 SWEETEN_Andrew_Apartment-20

To warm up the family and living room part of the great room, he decided to add a fireplace that wouldn’t require board approval to install. His search led him to a company called Hearth Cabinets, which has a patented technology that uses sterno-like gel to create a very realistic-looking fire. The fireplace meets all required codes and didn’t require any sort of approval.

SWEETEN_Andrew_Apartment-13

While renovating, he said he learned it’s important to dot your “i’s” and cross your “t’s.” “Don’t be casual about what fixtures you choose or what you allow the contractor to do without input, especially if, like me, you want to do a very custom, high-end project,” he said. Also, be nice to your neighbors. “One of mine complained about the noise and construction was shut down for two weeks.”

SWEETEN_Andrew_Apartment-17

With construction starting in November of 2016 and finishing in April of 2017, the obstacles he encountered extended the job about two months. While he said he wouldn’t choose to live through another renovation, he’s thrilled with the end result of this one. Because the space is on the 22nd floor, it gets great natural light. The terraces, located on each end of the great room, provide a feeling of indoor and outdoor living. “Being in the room,” the homeowner said, “feels like living in a peaceful oasis above the city.”

Sometimes two units are better than one! Read our 3-part guide on planning, budgeting, and financing your apartment combination.

Refer your renovating friends to Sweeten and you’ll both receive a $250 Visa gift card when they sign a contract with a Sweeten general contractor.

Sweeten handpicks the best general contractors to match each project’s location, budget, and scope, helping until project completion. Follow the blog for renovation ideas and inspiration and when you’re ready to renovate, start your renovation on Sweeten.

The post An Apartment Combination with a View appeared first on Sweeten Blog.

Q&A with Jean: Do I need temporary walls?

$
0
0

Jean

Sweeten’s Founder + CEO Answers Your Renovation Questions

Welcome to #7 in our series, designed to bring clarity to some of the mysteries of renovating! Whether you’re a first-time homeowner or a serial renovator, each project brings with it a new set of circumstances and new questions, and Sweeten is here to be a source of knowledge and reassurance. 

Feel free to email me at JBrownhill@sweeten.com with any reno questions or dilemmas you’d like addressed.

QUESTION: Do I need temporary walls?

temporary wallstemporary walls
A temporary wall seals off Heather’s kitchen renovation from the rest of her apartment

JEAN: Temporary walls are a way for you to protect the parts of your home that are not being renovated from all the dust and debris that is created from the parts that are. We see a lot of people using zipper walls, which are made of sheets of plastic. The plastic allows the space to be completely sealed off but still accessible because of the zipper. If you are doing a renovation that affects your entire home or apartment, you don’t need temporary walls, because everything is going to end up dusty and will need to be cleaned once the project is complete.


 2.Q&A-StayOrGo


If you are renovating your kitchen only, then we suggest creating a barrier between the space that’s being renovated and the spaces that are not, especially if you’re living in the home while the work is being done. If this is the case, be mindful of the particles in the air, some of which can be harmful to your health. You’ll want to keep all of those particles on the other side of the temporary walls.

Jean-Signature-150

Looking for more advice from Jean? Be sure to check out the sixth installment in this series, Q&A with Jean: What Is Skim Coating and Why Is It So Expensive?

Refer your renovating friends to Sweeten and you’ll both receive a $250 Visa gift card when they sign a contract with a Sweeten general contractor. 

Sweeten handpicks the best general contractors to match each project’s location, budget, and scope, helping until project completion. Follow the blog for renovation ideas and inspiration and when you’re ready to renovate, start your renovation on Sweeten.

The post Q&A with Jean: Do I need temporary walls? appeared first on Sweeten Blog.

Best of Queens: Renovating in the Borough

$
0
0

Here, some favorite projects in five neighborhoods

With a population almost as large as Brooklyn, and the biggest footprint of the five boroughs, Queens has a lot to offer. Besides its growing, international food scene, a mix of established neighborhoods and amenity-laden condos, and an influx of tech startups, there’s the proximity to Manhattan, the U.S. Open tennis tournament, and Citi Field (go Mets!). Here, Sweeten, a free service that matches renovators with vetted general contractors, features their completed renovations across the borough that present a wide range of design ideas from Long Island City to Ridgewood.

Queens renovation

When their tiny, 700-square-foot Manhattan apartment began to feel cramped, Sarah and Craig packed their bags and moved to Long Island City. They found a 1,160-square-foot one bedroom that felt enormous in comparison to their previous digs. At first, the spacious upgrade was more than enough. Four years later, a top-to-bottom renovation allowed the couple to transform their home into the stylish and eclectic space that they’d always wanted.

Queens renovation

The very tight kitchen in Lisa and Chris’s Kew Gardens co-op made cooking in the space awkward. If you opened the refrigerator door, you’d end up trapping yourself in the kitchen! Converting the wall into a peninsula widened the galley layout and increased dining and prep space. With the addition of new cabinets and appliances, the kitchen refresh was just what they needed to enjoy their home again.

Queens renovation

Housed in the former building of the Ridgewood Times newspaper, Michael and Chenta’s loft had deep roots in Queens. A condo conversion in the early aughts—white walls and wood floors—stripped the space of its original, industrial charm. Looking to restore some of that raw quality, the couple ripped up the tired wood floors and exposed the original concrete underneath.

Queens renovation

A long, systematic search for a larger space led Jonathan and Cecilia to a mid-century apartment in Elmhurst. With a 25-minute commute to midtown, the location was perfect for them. The 1,300-square-foot, 3-bed, 1.5-bath co-op was a true fixer-upper. The couple planned on making changes to the floor plan and updating fixtures and finishes in the kitchen, bathrooms, and living areas. The finished space more than meets their needs and goes above and beyond with his-and-her bathrooms.

Queens renovation

Nikki and Chris loved their neighborhood of Astoria, but needed more space. What the next apartment lacked in style and function it made up for in square footage. They focused their renovation on the kitchen and bathroom—the two spaces that would benefit the most from an upgrade. Custom cabinets, new appliances, and gold pendant lights took the kitchen from drab to fab. In the bathroom, the couple drew design inspiration from their favorite New York City restaurants, installing new fixtures and a fun, pineapple print wallpaper.

The next stop on the Sweeten tour is Prospect Heights! Take a look at some of our favorite Brooklyn renovations.

Refer your renovating friends to Sweeten and you’ll both receive a $250 Visa gift card when they sign a contract with a Sweeten general contractor.

Sweeten handpicks the best general contractors to match each project’s location, budget, and scope, helping until project completion. Follow the blog for renovation ideas and inspiration and when you’re ready to renovate, start your renovation on Sweeten.

The post Best of Queens: Renovating in the Borough appeared first on Sweeten Blog.


A Guide to Purchasing and Renovating a Townhouse

$
0
0

Townhouse renovation basics, from surveying site conditions and financing options to bringing in the pros at the right time

townhouse renovation
Janet and Jerry’s brownstone renovation

You’ve decided to buy and embark on a townhouse renovation. And not just that—you want one you can customize for your family. It’s both an exciting and ambitious undertaking, so read on for the 101 on what to look for when purchasing, how to obtain financing, and how to find the right team to tackle the project, including some advice from renovation matchmaker, Sweeten.

Finding the right house

If you’re looking for a townhouse to renovate, you probably already have an idea of the kind of home you are looking to create. You may have tired of neighbors stomping above you or a cumbersome co-op board, or perhaps you are drawn to the dream of owning your very own roof terrace and backyard. You might have grand plans for a wine cellar or a room to dedicate to a home theater. Maybe you’d also like rental income to offset the cost of home ownership, or you’re an investor looking to maximize rental income. Whatever your motivations, your townhouse renovation search should be narrowed to the properties that will allow you to create the lifestyle you’re looking for. We talked to Chris Halliburton, Associate Broker of Investment Sales at Compass, about the key questions to ask during your search.

What’s the history of the building?

This is where you gather information about the soundness of the property. New York City’s Department of Buildings (DOB) has a great site where you can look up the history of the property and see the violations, complaints, as well as applications and permits for prior work done to the property. Look for red flags, and use the information to determine whether prior work—especially structural changes or alterations to the plumbing, electrical, and mechanicals—has been executed properly. Property Shark is another place where you can access comprehensive, publicly available information about the property in question.

What’s the actual square footage versus the buildable square footage?

Many townhouses are on lots much larger than the current building footprint. For example, brownstones are often on 100-foot lots, but the building itself may only be 20’ x 35’. Chris explains that these properties can often be built back with extensions ranging from ten to 30 feet long, depending on the floor area ratio (FAR). The FAR is determined by the zoning designation, and in New York City, the Zoning Resolution designates ten residential districts. For example, a lot that is 20’ x 100’ in an R7-2 zone that has a FAR of 3.44 allows you to put up a 6,880-square-foot building.

You may also be able to expand vertically—this is almost always a given, says Chris, although you may be constrained by landmark preservation requirements (see below). Similarly, you should explore excavation possibilities for creating a cellar. While below-grade space is not counted in the square footage, it is often useful to add space below for mechanicals or storage, even if it is not livable. By storing these elements underground, you can free up space above grade to maximize your living space and/or rental income potential.

townhouse renovation
Marsha and Adam’s townhouse renovation

What are the existing conditions?

In addition to the information that you gather via city databases, pay attention to the existing conditions of the building. Are there signs of water damage, mold, or termites? Also be aware of outside forces beyond an owner’s control—is there a lot of ongoing or planned construction in the area? If there is an empty lot next door, find out what is happening there. Chris points out that the construction of tunnels for the Second Avenue subway was a major issue for surrounding properties, not only in terms of noise and inconvenience but also with structural damage related to shifting foundations.

Is the property landmarked in a historic district?

The Landmark Preservation Commission is New York City’s governing agency for preserving buildings and sites that are culturally, historically, and architecturally significant. Many brownstone townhouses happen to be in designated historic districts—there are a total of more than 36,000 landmark properties in 141 historic districts and extensions throughout the five boroughs, according to the LPC’s website. If the townhouse you’re considering is protected, you will need to submit any planned changes to the LPC for review at the same time that you submit plans to the DOB. Chris explains, “Anything that the LPC approves will be approved 99 percent of the time by the DOB. But it’s not the case vice versa.” In particular, any changes to the façade will be scrutinized by the LPC. For example, while a back extension will not affect the view of the building from the street, adding floors will. If you want to add to the top of the building, you may be required to start 20 feet back from the front of the building, so that the additional floor can’t be seen from the street.

An LPC review will add extra time to your townhouse renovation, so this should be a consideration, especially if you are looking to bring in rental income on a deadline.

Financing your townhouse renovation

Obtaining financing for a townhouse purchase and renovation is essentially the same process as a condo purchase and renovation (co-ops are the outlier here). This is because a townhouse, like a condo, is real property. You can consult this Sweeten guide on financing home renovations. If you are financing both the purchase of the property as well as the renovation, you have a few options:

Apply for a construction loan and a permanent mortgage separately. This means you will need to research two separate loans and pay for two sets of closing costs. Some lenders only provide construction loans, while others will only make combination loans. Construction loans typically run for 12 months or under and are subject to an adjustable interest rate that resets quarterly or sometimes monthly.

townhouse renovation
Nazli and Larry’s brownstone renovation

Alternatively, you can apply for a construction-to-permanent loan. This combination instrument simplifies the process because you only need to take out one loan and pay closing costs once. It’s the more popular option for this reason. While construction is ongoing, you only pay interest on the outstanding balance, and then it is converted to a mortgage after the renovation is complete. You may, however, pay more for the permanent mortgage because the need for a combination has reduced your lender options.

As with so many aspects of home renovation, the way to assess what is best for your situation is to consult a pro—in this case, a mortgage banker.

Lining up an all-star team

When searching for a townhouse to renovate, it’s important to gather the experts who will not only help you get the job done right but who can help you assess whether it’s a project worth tackling in the first place. For this reason, you’ll need to line up several professionals early on, including structural engineers, electricians, and plumbers. Chris Halliburton suggests that you bring these pros in for site visits prior to signing the contract so that you don’t “end up buying a money pit.” He estimates that you could have all these consultations done for roughly $1,500 to $2,000. When it comes to general contractors, Sweeten’s own founder, CEO—and trained architect—understands firsthand the importance of having a professional you can trust. “When I started to renovate my own Brooklyn brownstone, I ended up hiring the wrong general contractor,” she says. “If I can make a wrong choice, anyone can.” She started Sweeten to help homeowners find licensed and vetted contractors and to ultimately renovate fearlessly to create a home they love.

Many thanks to Chris Halliburton of Compass for his insights!

Jean, founder and CEO of Sweeten, tells us what to know before renovating a brownstone in the first installment of her renovation Q&A series.

Sweeten handpicks the best general contractors to match each project’s location, budget, and scope, helping until project completion. Follow the blog for renovation ideas and inspiration and when you’re ready to renovate, start your renovation on Sweeten.

The post A Guide to Purchasing and Renovating a Townhouse appeared first on Sweeten Blog.

A DIY Demo Finally Gets a True Remodel

$
0
0

A bathroom spruces up from puzzle to solution

SWEETEN ElizabethBorri-Kitch-Bath-Laundry06

Project: Add a shower and update a half-bath/laundry room in Manhattan’s Financial District

Before: Back in 1996, Elizabeth purchased a loft in a circa 1908 building in the Financial District. She gutted and renovated the 3-bedroom, 1.5-bathroom apartment except for the half-bath, which included a full-size washer and dryer. The layout worked well enough, but eventually, Elizabeth wanted the half-bath upgraded and updated to a full bath/utility room that included shelving and cabinetry—and the décor needed to flow seamlessly with that of the nearby kitchen. The trickiest part was figuring out how to fit everything she wanted into this room. She did the demo herself, and partway through, with design ideas in mind, Elizabeth posted her project on Sweeten, a free service that connects renovators with vetted general contractors.

bathroom storagebathroom storagebathroom storage

After: Elizabeth’s Sweeten contractor discovered a space behind a wall—about a linear foot and a half—making it possible to have a larger shower base and sink. Yay! They also found space by stacking the washer and dryer. And while she was worried that all the bits and pieces would fit in the room, her contractor was able to build lots of custom details like slide-out shelves and cabinetry for storage so the room would be functional yet not overcrowded. She was especially pleased with the “beautiful job he did on the floor and with the matching Cambria surfaces.”

bathroom storagebathroom storagebathroom storagebathroom storagebathroom storagebathroom storage

Bonus: Despite a slightly irregularly-shaped footprint, the homeowner and her contractor maximized the space without compromising the narrow walk-through in the form of freestanding and built-in cabinets.

Style finds: Countertops: Cambria. Floor tile: Floor & Décor. Shower Door: GlassCrafters Inc.

To create room for a washer and dryer in the bathroom, Lindsay and Nicholas tore out their single shower stall, relocated the shower fixtures to the bathtub, and built a laundry closet in its place.

Refer your renovating friends to Sweeten and you’ll both receive a $250 Visa gift card when they sign a contract with a Sweeten general contractor.

Sweeten handpicks the best general contractors to match each project’s location, budget, and scope, helping until project completion. Follow the blog for renovation ideas and inspiration and when you’re ready to renovate, start your renovation on Sweeten.

The post A DIY Demo Finally Gets a True Remodel appeared first on Sweeten Blog.

A Jewel of a Space, Worth the Wait

$
0
0

An architect spends five years dreaming and planning her own home

When she discovered it, Lauren DeMattia loved everything about this 700-square-foot, 1920’s Brooklyn Heights co-op—except the kitchen. As an architect, she knew that living in the space would be the best way to determine how to design it to work for her lifestyle. After much back-and-forth, she decided to move the stove to another wall to gain counter space, lose a large closet, and install built-ins and drawers for storage. She didn’t realize her journey from bad design to a “wow” kitchen would take such a long time, even before she found Sweeten, but she’s glad it did. After she posted her project on Sweeten, she was able to achieve a layout that worked with the space she needed to cook and entertain with abandon.  

SWEETEN LaurenDeMattia-Kitchen06Guest post by Brooklyn Heights homeowner Lauren DeMattia

To say I had won the real estate lottery in 2012 might feel like an overstatement, but after a short apartment hunt, I found a co-op in Brooklyn Heights that was everything I had been looking for—two bedrooms, a corner unit, lots of windows, high ceilings, and a single block from multiple subways. The only drawback was that the place needed a lot of work.

Before moving in I did some things that really needed doing: putting in new hardwood floors, fully gutting the original bathroom, and installing updated electrical and lighting. At the time, the idea of touching the kitchen was out of the question—and budget. But it was, thankfully, the newest portion of the apartment and didn’t necessarily need work, yet. It also had a weird layout that didn’t exactly scream a clear solution. As a bit of a perfectionist, I wanted to live in the apartment long enough to come up with the right solution before I started knocking down walls.

SWEETEN LaurenDeMattia-Portrait

SWEETEN-LaurenDeMattia-Kitchen-BeforeAfter

Ultimately, I knew I wanted a kitchen that felt open to the living room, with lots of storage (this is NYC), and a layout that still provided some sort of entryway and coat closet.

As soon as I moved in, I began thinking about and talking about my most recent, “brilliant” plan for the kitchen layout to friends and family. First, I was set on island, then a peninsula, then thought about moving the plumbing. I realized that I had to narrow down what was and wasn’t working for the space.

SWEETEN LaurenDeMattia-Kitchen05SWEETEN LaurenDeMattia-Kitchen04SWEETEN-LaurenDeMattia-Kitchen23

The layout technically had a lot of counter prep space, but it was in two separate areas so that I often had my back to my guests while I cooked. I loved the giant coat closet within the “entry,” but keeping it meant my options were limited. The appliances were in decent shape, though oversized for the space. A weird drop ceiling over part of the kitchen made it feel disconnected from the rest of the living room. This ceiling, coupled with a half-height wall that separated the front door from the kitchen, made the kitchen feel smaller than it actually was.

SWEETEN LaurenDeMattia-Kitchen-Before02SWEETEN LaurenDeMattia-Kitchen02

Five years and probably quite a few exasperated friends and coworkers later, I settled on a plan for the kitchen. There would be no island and no peninsula. Everything was out from floor-to-ceiling. The huge coat closet was partially removed to make room for custom cabinets, panel-ready appliances, and a new drop ceiling that mirrored the curve of the floor transition from new tile to my existing hardwood floors. With the coat closet gone, I decided to expand the closet in my bedroom to make up for the lost space. Aesthetically, I’ve always loved blue cabinets and knew that I wanted to do darker kitchen cabinets with a lighter floor and a whiter countertop with some wood accents.

I chose a separate cooktop and oven because the space I had for the stove was much deeper than a traditional countertop and I wanted to take full advantage of the space I had. I also wanted the appliances to look seamless and fully integrated. Plus, I hate the weird space that always happens between a stove and the cabinet where dirt and food collects.

SWEETEN LaurenDeMattia-Kitchen16SWEETEN LaurenDeMattia-Kitchen15SWEETEN LaurenDeMattia-Kitchen06

To get more workable counter space, I moved the stove to another wall. The original location of the refrigerator was a perfect spot. The sink remained on its original wall and was centered in order to get counter space on either side and also close to the cooktop/oven. By doing this, I also created two zones for prep on either side of the sink.

Once I made the decision about the sink and cooktop/oven, I knew that the old coat closet had to downsize to make room for the refrigerator. I opted for a panel-ready refrigerator because I felt like opening the front door and having a seamless wall of cabinetry would help mitigate the fact that you were walking right into the kitchen. Functionally, I was also trying to create a triangle between my sink, cooktop/oven, and the refrigerator.

Just to the left of the refrigerator happened to be the perfect location for a pantry. I had some built-in pull-out drawers earmarked for my pots and pans and a simple pull-out wire drawer (it was super easy to install!) for my pantry items. With storage, food and the refrigerator covered, I used the remaining space to the right of the refrigerator to create a new coat closet.

SWEETEN LaurenDeMattia-Kitchen-Before01SWEETEN LaurenDeMattia-Kitchen19

Based on the way my apartment “boundaries” were, there was a funny niche on the TV wall into which a counter and cabinets were installed. With the new design, there’s storage below where my microwave and toaster oven live and “open” storage above to display my pretty kitchen items. The glass doors open and hide away so the countertop can be used as a bar top for parties.

I wanted to also have a place to eat. By pushing my living room furniture closer to the window, I made room for a new dining table and chairs. I had the pendant lights installed over the table. Extra work had to be done to build out the beam in the ceiling to hide the electrical boxes.

Much like the kitchen design, the idea of a built-in at the window had been on my mind since I bought the apartment. With a millworker already doing custom cabinets I figured it was time to have the built-in done as well. A sleek bookshelf was created that also hides my radiator and air conditioner units that were always annoyingly off-centered from the windows. I selected a “piano” finish on the top of the bookshelf for easy clean up. I’m looking forward to exercising my hopefully-green thumb.

SWEETEN LaurenDeMattia-Kitchen17SWEETEN LaurenDeMattia-Kitchen01

I optimistically planned for a “quick” two-month renovation, during which I camped out in the second bedroom with all my possessions and a microwave. Of course, it took almost three months before I was able to move back into my own bedroom and another two months before the project was officially finished.

My advice for anyone preparing for a renovation: take your time. Do your research; debate all the possibilities. It was better to wait and mull over all my plans (for years!) before making the investment. Using Sweeten helped with the process of finding a contractor. I appreciated being able to read references and see photos of previous projects so I could see the quality of each contractor’s work.

Renovating my own space as an architect was good and bad: good because I knew what I wanted and how to articulate it to the contractor. But also bad, or rather tricky, because I knew exactly what I wanted and expected a specific level of quality and detail.

The final result was worth the discomfort and occasional tears. I’m incredibly happy with my new space. The kitchen is so bright and open, the layout functional with tons of storage, and I was even able to make space for a proper dining table. Now, instead of talking to my friends about my renovation, I get to talk to them about the next time they’re coming for dinner.

KITCHEN RESOURCES: Cabinets: Custom. Cabinet knobs: Simon’s Hardware & Bath. Quartzite “macaubas” countertops and backsplash: European Granite & Marble. Appliances: Bosch. Floor tile: Mosaic House. Floating Shelf: Custom. Dining table and pendants: Room & Board. Dining chairs: Overstock.

LIVING ROOM RESOURCES: Sofa: Crate & Barrel. Rug: Rugs USA. Table: DIY by homeowner.

The post A Jewel of a Space, Worth the Wait appeared first on Sweeten Blog.

Sweeten on The TODAY Show

$
0
0

The story of a leading-edge business creating homes people love

The TODAY Show’s Savannah Guthrie interviews Sweeten founder and CEO Jean Brownhill, who describes how she conceived of the idea for Sweeten and offers advice to entrepreneurs.


How Sweeten Works
Renovating? We’re here to guide you on what to look for in a general contractor, preparing for bids, and making sure things go smoothly. You’ll find a printable Renovation Checklist here.

Sweeten handpicks the best general contractors to match each project’s location, budget, and scope, helping until project completion. Follow the blog for renovation ideas and inspiration and when you’re ready to renovate, start your renovation on Sweeten.

The post Sweeten on The TODAY Show appeared first on Sweeten Blog.

Skim Coating: The Answer to Perfect Walls

$
0
0

These walls have a smooth reputation

If you want the walls of your home to look flawless, skim coating will make them as smooth as silk. This technique allows you to get the surface of your walls perfectly even by sanding down bumps and spreading plaster to fill in nicks and scratches. Although the process can be expensive, for many, the beautiful results are well worth the cost. Below, five Sweeten homeowners skim coated their walls, addressing uneven surfaces and imperfections.

skim coating

For a seamless look, each of the three bedrooms in Marsha and Adam’s townhouse were skim coated and painted in Benjamin Moore’s Super White. The walls act like a blank canvas, allowing the couple’s modern, mid-century furniture and decor to take center stage.

skim coating

One of the main goals of Cat and Jordan’s renovation was to make their apartment “look as big, bright, and clean as possible.” At first, Jordan didn’t want to spend the extra money on skim coating, but he’s glad they went for it. “I can’t believe what a difference it made—the whole place looks lighter, brighter, and fresher.”


1.Q&A-SkimCoating (3)


skim coating

While renovating the kitchen and bathroom, Amy and Nick stripped old molding from their apartment and replaced it with crisp new trim. Next, the walls, ceilings, and doors were skim coated and given a fresh coat of paint to create a clean backdrop.

skim coating

Thinking outside the box led Sam and Sean to take down the walls that boxed in their kitchen, cutting it off from the living room. The remaining walls needed to be brightened up. Skim coating and paint provided the much-needed facelift.

skim coating

Before work began, Lauren asked her contractor if there was anything missing from the scope of her project. He suggested skim coating the walls and ceilings, pointing out bowed beams and the uneven surface of the walls. Lauren took his advice and the impact of the update made the apartment feel brand new again.

Looking to refresh the walls of your home? Check out our guide Budget Basics: Interior Painting Costs.

Refer your renovating friends to Sweeten and you’ll both receive a $250 Visa gift card when they sign a contract with a Sweeten general contractor.

Sweeten handpicks the best general contractors to match each project’s location, budget, and scope, helping until project completion. Follow the blog for renovation ideas and inspiration and when you’re ready to renovate, start your renovation on Sweeten.

The post Skim Coating: The Answer to Perfect Walls appeared first on Sweeten Blog.

Home Renovation Costs: Fairfield County Edition

$
0
0

Plot your reno budget and be one step closer to your Connecticut dream space

general contractor Fairfield County

Renovation is a reinvention towards a new level of home for you and your family. Creating a budget for a renovation is unique to every project; the many variables, from your own taste for materials and quality of work to whether you are changing the layout or whether you are moving plumbing or gas lines in a kitchen or bathroom, all factor into the equation.

Sweeten, a free service matching homeowners with vetted general contractors, has compiled a general guide to costs across the county from Greenwich and Westport to Stamford, focusing on four renovation categories—kitchen, bathroom, basement, and permits. Keep in mind that every professional contractor will want to have a detailed chat and inspection of your home before developing an estimate specific to your needs and wants.

Cost per square foot

Somewhere between $220 and $250 per square foot is the general gauge of a gut renovation in Fairfield County, said Elizabeth, an architect in the Sweeten network. That price can easily sneak up to $300 to $350 a square foot, she advised, depending on how complex your renovation is (structural issues, layout changes, etc.) and how expensive your tastes are in terms of fixtures and finishes. Those figures also do not include fees for architects and engineers who might be necessary throughout the course of the project.

Kitchen

The range of projects that Alfonzo, a Sweeten contractor, has worked on in the Fairfield County area has varied greatly. On the low-end, he has done basic kitchens for $85 a square foot using big-box materials, all the way up to projects costing closer to $250 a square foot which installed higher cost materials like tile, built-ins, or custom items.

Remodeling’s Cost vs. Value report puts a typical mid-range kitchen renovation at $320 per square foot, or $64,000, as an average for the Connecticut, New York, New Jersey, and Pennsylvania areas. These figures are based on a 200-square-foot kitchen with laminate countertops, a standard sink, and faucet, with an energy-efficient range, built-in microwave, and ventilation system. It also includes a garbage disposal, custom lighting and resilient floorings such as vinyl, linoleum, or cork. New kitchens that Elizabeth’s architectural firm has worked on usually cost between $25,000 to $60,000, but it is easy to surpass that, she said.

A high-end kitchen renovation would mean fully custom cabinets, sourcing the best materials from overseas, and dealing with the added expense of a layout change, Alfonzo said. A recent kitchen renovation he worked on came to $125,000. The cabinets alone were $70,000, the countertop material was shipped in from Italy, and changing the layout of the kitchen also bumped up the cost and involved substantial plumbing and electrical work. The example Alfonzo used matched the average price of a high-end kitchen in the Cost vs Value report, which equated to $630 a square foot. This includes more expensive materials such as stone countertops, an imported tile backsplash, a water filtration system, commercial-grade cooktop and vent hood, plus a built-in microwave unit.

general contractor Fairfield County

Bathroom

For a low-end and very small bathroom, Alfonzo has done projects that come in at less than $6,000. At this price, it is usually a powder room with only a toilet.  A mid-range bathroom in Connecticut, Pennsylvania, New York, and New Jersey will cost on average $20,000, according to the Cost vs Value report. That’s $570 a square foot for a 35-square-foot bathroom. This includes a recessed medicine cabinet, a standard toilet, solid-surface vanity country, and a porcelain-on-steel tub. A budget of between $10,000 and $20,000 is typical for a full bathroom renovation in the Fairfield area, according to Elizabeth.

That same report put a high-end bathroom renovation and expansion at $63,249. The sample bathroom was expanded from 35 square feet to 100. It amounted to $630 a square foot. One of the more expensive bathrooms Alfonzo worked on came in at $88,000. This included a walk-in closet that led into the bathroom. The client wanted a custom-made European toilet, major structural changes, and marble shipped from Italy, which took three months to arrive.

general contractor Fairfield County

Basement

Basement renovations by Sweeten contractors have ranged from $30,000 to $100,000. The elements that tend to inflate the budget include adding a toilet or a shower and work needed to bring the room up to code. Some town regulations might require two forms of egress or natural light (so adding a door or a window) or a certain ceiling height, which means digging down and lowering the floor. An average basement conversion in the Connecticut, New York, New Jersey, and Pennsylvania areas is $75,000, according to the Cost vs Value report. The project for this sized budget includes a 20′ x 30′ room and a 5′ x 8′ bathroom with a shower and a bar area as well insulation and laminate flooring, which comes to $117 a square foot.

Permits

Each town in Fairfield County has its own table of fees for building permits. In Alfonzo’s experience, building permits, including those for plumbing and electrical, can cost anywhere from $300 to $2,500 per project. The variation is often tied to your budget. For example, in Stamford, your building permit will be $13.26 for each $1,000 in your budget. That permit will cover your electrical, plumbing, and HVAC work.

Over in Norwalk, building fees are structured slightly different. A building permit costs $13 per $1,000 of estimated work, which includes some electrical, plumbing, and HVAC work. However, if there are major changes in these areas, then separate permits for electrical, plumbing, and HVAC might be required at a cost of $13.26 for every $1,000 budgeted in those areas. Check the building department in your local township for a better idea of permitting costs for your project.

Issues you may or may not encounter along the way such as structural problems that need fixing or bringing a staircase up to current code could also manipulate your end budget. Take into consideration wet areas like kitchens or bathrooms cost more to renovate than dry spaces (for example, dining rooms and bedrooms) due to materials and labor that may be more complex, Alfonso says.

Hopefully, all of these facts and figures give you a jumping-off point to begin pulling together a budget. Sweeten’s Renovation Checklist offers you a downloadable roadmap to organize all of the moving parts of a renovation including laying out your “must-haves” and “nice-to-haves.” Once you post your project on Sweeten, we’ll match you with multiple excellent contractors who could provide estimates. Sweeten also checks in with you until project completion. Just remember, sit down with your general contractor to develop an accurate budget and you’ll be on your way to the home you’ve always wanted.

Wondering how long a renovation takes? We’ve outlined a typical kitchen and bathroom renovation so that you can become familiar with each step in the process.

Refer your renovating friends to Sweeten and you’ll both receive a $250 Visa gift card when they sign a contract with a Sweeten general contractor.

Sweeten handpicks the best general contractors to match each project’s location, budget, and scope, helping until project completion. Follow the blog for renovation ideas and inspiration and when you’re ready to renovate, start your renovation on Sweeten.

The post Home Renovation Costs: Fairfield County Edition appeared first on Sweeten Blog.

Prepare for Serious Closet Envy

$
0
0

Side-by-side built-in wardrobes are a “wow”

closet renovation

Project: Creating a luxury closet for a master bedroom in upper Manhattan

Before: This one-bed, one-bath co-op apartment in Morningside Heights, Manhattan, had plenty of historic charm. It came with all the turn-of-the-century details that one looks for in a prewar apartment: beautifully preserved wainscoting and molding in the dining room, and hardwood floors throughout the entire apartment. It did, however, need a thorough refresh—and as part of the renovation, the homeowner installed a unique closet solution in the master bedroom. Read on for some serious closet envy!

When the homeowner first purchased the property, the bedroom had a small closet that left unused space in an awkward nook. It made sense to extend the closet along the entire wall to make full use of the available square footage for storage. Like Sweeten renovator Jacob, this homeowner also began to examine custom possibilities. He settled on an entirely custom solution, got a set of design drawings, and posted his project to Sweeten, a free service that matches homeowners with vetted contractors. This Sweeten contractor helped to execute his vision.

SWEETEN_SandyFernandez_BathBed_Before02

After: Rather than choosing a modular closet product, this custom solution was crafted especially for the space. The final product is reminiscent of prewar built-in armoires: it is flush with the wall and is finished in a transitional style, with both Shaker and flat panel fronts and simple nickel hardware. The Sweeten contractor helped to navigate the structural issues with the design, and took it from a concept to a completed product. This involved demoing the old drywall and hollow-core closet doors and framing out the space for the new built-in wardrobes. A millworker created and pieced together the built-in on site under the direction of the Sweeten contractor. The wardrobes themselves are constructed out of birch and plywood and finished with a matte white paint.

Much like custom built-ins in living rooms and other spaces, a fully custom closet is typically priced out by the linear foot. In NYC, this starts at approximately $800 to $1,000 for open shelving, while additional features such as doors, drawers, lighting, and other specialized solutions raise the cost.

closet renovation

Bonus: The wardrobes were also wired for electricity so that the homeowner could easily see his clothing when the doors opened.

Take a look below for inspiration from other Sweeten homeowners who have added customized closets to their renovations.

closet renovation(Above) Whitney’s walk-in closet has plenty of drawers and hanging space (Interior by easyclosets.com)

closet renovation(Above) Lauren’s closet has clothing and shoe storage covered, eliminating the need for a dresser (California Closets)

closet renovation
(Above) Nancy’s walkthrough closet transformed the hall to the bath into the perfect studio storage space (California Closets)

We’ve seen all kinds of closet renovations with storage solutions for every space, from small studios to airy loft apartments.

Refer your renovating friends to Sweeten and you’ll both receive a $250 Visa gift card when they sign a contract with a Sweeten general contractor. 

Sweeten handpicks the best general contractors to match each project’s location, budget, and scope, helping until project completion. Follow the blog for renovation ideas and inspiration and when you’re ready to renovate, start your renovation on Sweeten.

The post Prepare for Serious Closet Envy appeared first on Sweeten Blog.


A Townhouse Makes a Connection

$
0
0

A bigger place and “daunting” remodel in Brooklyn

For a decade, AJ and Ray lived in a 450-square-foot studio apartment in Sunset Park, Brooklyn. In search of more space, they traveled a few stops south on the subway and landed a 3-floor, 2-family brick row house just across the street from the neighborhood’s park, offering views of New York Harbor and Manhattan. The home was a whopping 2,964 square feet—not an unusual size for a townhouse, but much larger than what they were used to. After three years of test-driving their new space, they opened up rooms and improved the flow from front to backwhile expecting a baby. Here’s how AJ and Ray used Sweeten, a free service matching renovators with vetted general contractors, to gut renovate and turn a nondescript house into an open oasis for their family of three.

townhouse renovation
Guest post by Sunset Park homeowner Ray

We bought the house to renovate but lived in it for three years as we planned for the renovation. The place had been poorly maintained as a rental for many years (drop ceilings, temporary walls, very old roof, the works). It needed to be updated and modernized. The property was set up as a two-story, two-family house. There was an apartment on each floor—one bath, one bedroom, a kitchen and a living room. New kitchens and bathrooms don’t come cheap, and the renovation seemed daunting.

townhouse renovationtownhouse renovationtownhouse renovationtownhouse renovation

We had lived in a small studio and were used to an open floor plan. When we moved into the new house, it was small and blocked off from all of the other rooms. It made it difficult to chat and hang out with each other. We weren’t used to the feeling of being separated. Figuring out the best layout, style, and finishes were left to AJ and Robin, her sister and an interior designer at RobinR-N. We were interested in an open entertaining space on the first floor with three bedrooms on the second floor.

We were hoping that our renovation would be fast and straightforward. It was certainly not straightforward! Although the interior was designed and planned by Robin, we had to hire an architect and expeditor to draw and file the plans. We interviewed at least eight contractors, but the one we initially selected, and who filed the plans with the city, had underbid and sent us a contract that was overpriced. After going back and forth, we ultimately abandoned him and found our design-build firm on Sweeten after posting our project.

townhouse renovationtownhouse renovationtownhouse renovationtownhouse renovation

Robin and AJ worked together to create a cohesive aesthetic for the house. In the kitchen, they looked to capture the light streaming through the back windows, and keeping the space as light and fresh as possible. “With the beautiful southern light at the back of the house and the openness of the view to the backyard, it made sense to relocate the kitchen there and open the rest of the house up to that space,” said Robin.

townhouse renovationtownhouse renovation
(Above) Entry door from the inside (l), and exterior front door (r)

On mini-splits: Ray had a hard time saying goodbye to the NYC radiators he had spent his entire life around. It was always too cold or too hot—and he LOVED it, says AJ.

The entry hall corridor leads directly to the kitchen. The lightness of the kitchen helped connect the spaces visually from the front to the back of the home. “The dark floors and kitchen table and chairs made a nice contrast to white cabinets and the light Caesarstone countertops,” says Robin. The kitchen island was a main feature of the space. From a recommendation from AJ and Robin’s mom, it housed the sink and an open built-in shelving area at one end for cookbooks and some baby items, making use of every inch of space!

townhouse renovationtownhouse renovationtownhouse renovation

“The space was designed to accommodate the way they live,” explained Robin. “If someone is cooking or the baby is playing, the family and guests can congregate on the ground floor and still feel connected even if they are in different rooms.” For lighting, they decided to keep the ceilings minimalist, choosing surface-mount fixtures and pendants to be a design focus.

townhouse renovation
(Above) Master bedroom (l) and guest bedroom (r)townhouse renovation
(Above) Master bedroomtownhouse renovation
(Above) Guest bedroomtownhouse renovation

In terms of layout, we had two options for a third bedroom: it could go in the front of the house with a window, or in between the two other bedrooms where it currently sits. After working on the drawings, Robin determined that we could get more space using the space adjacent to the front bedroom than the space that is now a bathroom. According to the Department of Buildings code, we needed light and an egress to make sure that it could be called a legal bedroom. In order to accomplish this, we needed to put a skylight into the middle bedroom as part of the roof update. It seemed odd at the time, but in the end, the room ended up being perfect for the baby, who we were already expecting when the renovation began.

townhouse renovation
(Above) Second-floor stairwaytownhouse renovation

Lastly, although we wanted air conditioning in the house, central air was a huge financial commitment. Mini-splits were suggested, but our past landlords had put a unit in our old apartment near the end of our time there, which we liked functionally but not aesthetically. After much back and forth, we decided on a ducted mini-split system so that the air-handling units were hidden in the ceilings; we only lost a little height in the first-floor hallway.

townhouse renovationtownhouse renovation

This was an enormous undertaking for us, and as much of a rush that we were in with a baby on the way, we appreciated that our Sweeten contractor slowed us down and walked through the entire the process with us, down to the details of the toilet paper holder. Our renovation was a design-build job and our Sweeten contractor had all the details of what needed to be done written down on paper for our review. We appreciated the attention to detail.

The best advice we can give is to ask questions even when things get technical and you are in over your head. And be patient! Our main questions were: Can we afford this? What is the payment schedule? Can the house be done before the baby arrives? What is your timeline?

We were most excited about having space, a real kitchen and closets, which was a huge change from where we were living before. When we worked on the interior layout, it seemed like we had planned for an extreme amount of storage space, but wouldn’t you know, we’ve managed to use it all!

We are so glad that we found our Sweeten contractor—we couldn’t have been happier (or luckier!).

Thanks to AJ and Ray for sharing your stunning townhouse with us!

KITCHEN RESOURCES: Engineered Hardwood Faulkner Hickory floors: Hurst Hardwoods (similar). Kitchen cabinets: Custom. Countertops: Caesarstone. 4×10 U081 White Ice Bright US Ceramic tile backsplash: Floor & Decor Outlet of America (similar). Trinsic kitchen faucet: Delta. Stainless steel 24X16 under-mount sink: ELKAY. Refrigerator: LG. Dishwasher: Bosch. Range: Samsung. Microwave: Panasonic. Hood: Whirlpool. Glass cone shade light, semi-flush mount: Industrial Light Electric. Conical 30″ drum pendant: Rejuvenation.

LIVING ROOM RESOURCES: Grand Brass Mobile chandelier: West Elm.

HOME OFFICE RESOURCES: Global pendant light: CB2.

MASTER BEDROOM RESOURCES: SAIC Together pendant light: CB2.

MASTER BATH RESOURCES: Bianco 12×24 Natural floor tile Bardiglio Series: Ceramic Tile 4 U. 4X4 U081 White Ice Bright wall tile:  Floor & Decor Outlet of America (similar). Delta Trinsic polished chrome hardware: Build.com. Grohe 8″ rain head polished chrome shower fixtures: Home Depot. Amare 60″ single bathroom vanity set with mirror: Wyndham Collection. Essence faucet: Grohe. Cadet Pro toilet: American Standard.

GUEST BEDROOM RESOURCES: Catalina Lighting 3 Light drum pendant: Amazon.

POWDER ROOM RESOURCES: Elite Tile Alameda Ceramic Field Blue floor tile: AllModern. Champion Pro toilet: American Standard. Veer 24″ pedestal sink: Kohler. Delta Trinsic faucet: Build.com.

Dreaming of living in a townhouse? Check out our guide on purchasing and renovating one.

Refer your renovating friends to Sweeten and you’ll both receive a $250 Visa gift card when they sign a contract with a Sweeten general contractor. 

Sweeten handpicks the best general contractors to match each project’s location, budget, and scope, helping until project completion. Follow the blog for renovation ideas and inspiration and when you’re ready to renovate, start your renovation on Sweeten.

The post A Townhouse Makes a Connection appeared first on Sweeten Blog.

Things I Wish I’d Known…

$
0
0

Sweeten homeowners share their best reno advice

renovation advice
Homeowners Marsha and Adam with their two daughters

They say the best way to learn is by experience. If that’s the case, then the second best way to learn is by talking to the people who have been in your shoes before. Sweeten homeowners emerge from the renovation process with more than a few “Aha!” moments and generously share their hard-won knowledge with our readers on the blog. We’ve gathered some of their most meaningful advice below. Wherever you happen to be in your renovation journey, we hope this insight will help guide you while creating your very own home sweet home.

renovation advice

The original cabinets in this homeowner’s kitchen were too shallow; in fact, closing the cabinet doors had chipped most of her plates. When it came time to renovate, deeper cabinets were a must. If you’re planning a kitchen renovation, this homeowner shares the following advice: “Measure all your cookware and then use those measurements to design your kitchen cabinets. It made us feel a little OCD to do this, but it really paid off.” Even if you plan on buying stock cabinets, rather than having them custom-made, measuring the interiors to make sure that all of your cookware will fit is a smart move.

renovation advice

If you want to make a tight timeline work, Nate and Michelle recommend that future renovators order materials as soon as possible. “Make sure you have all the pieces before starting. That includes the tile, fixtures, vanities, toilets, and even the little things like towel hooks and toilet paper holders. That way, your project isn’t held up while waiting for some piece to come in,” Nate said. Purchasing stock items versus custom or special order will make it easier to stay on schedule. At Sweeten, we see homeowners placing orders for materials without consulting with their contractor on the timeline, which can cause major project delays, so this is sage advice.

renovation advice

One of the major lessons that Brooke learned while renovating is that paint colors never look the way you expect them to look once they’re on the walls of your home. “I had eight swatches of gray and greige paint on the [kitchen] walls for weeks and finally decided on Wickham Gray from Benjamin Moore. The day the contractor was painting the kitchen, I was working from home. I came downstairs to see a neighbor, and she immediately said, ‘I didn’t know you were going green in the kitchen.’ So we turned around and went with Gray Owl [another Benjamin Moore paint] instead,” Brooke said. The takeaway: if there’s a tint, or a hint of another color, visible from the paint swatch, expect it to have a much bigger effect on your space when your walls are painted.

renovation advice

Soundproofing is rarely noticeable—it’s essentially invisible—but the role it plays can have an enormous impact on your daily life. “Paying more for soundproofing the bathroom (so you don’t hear anything from your bedroom) is worth every penny,” Marsha said. “We really appreciated our Sweeten architect telling us that we ‘needed’ those more expensive items—she was right.” Of course, you don’t have to soundproof your bathroom, but if you can fit it into your budget, this extra step will elevate the comfort of your home.

renovation advice

Sticking to your budget can be difficult, especially when quality is your top priority, but doing so pays off when something unexpected happens—such as finding out that you need more materials than you initially budgeted for. When considering brands of non-toxic paint, Sarah looked at high-end options first before choosing a budget-friendly brand. The economically priced VOC-free paint turned out to be a smart decision. “Our plaster walls drank up the paint and we ended up having to buy 25 gallons when we originally budgeted for ten,” said Sarah. Since she chose an affordable option from the get-go, the extra gallons of paint didn’t break the budget.

See how 5 couples (and first-time renovators!) tackled remodeling their homes together.

Refer your renovating friends to Sweeten and you’ll both receive a $250 Visa gift card when they sign a contract with a Sweeten general contractor.

Sweeten handpicks the best general contractors to match each project’s location, budget, and scope, helping until project completion. Follow the blog for renovation ideas and inspiration and when you’re ready to renovate, start your renovation on Sweeten.

The post Things I Wish I’d Known… appeared first on Sweeten Blog.

A Bathroom Desperately Seeking Storage

$
0
0

A Brooklyn bathroom gets an update—and radiant floors

SWEETEN Sari Resnick Bathroom01

Project: Add square footage and storage to a master bathroom in Brooklyn

Before: Sari, a post producer for television commercials, bought a one-bedroom condo in a 45-unit building in the Crown Heights/Prospect Heights neighborhood four years ago. She loved the location and feel of the apartment as soon as she walked inside. There were plenty of closets and storage spaces, she said, but “it was mind-blowing to me that there was no storage at all in the bathrooms. “Who designs a bathroom with no storage space? Crazy, right?” And despite it being built in the aughts (in 2006), the floor tiles and lighting were tired and the large entry door took up a lot of wall real estate.

After: Sari envisioned changing the whole layout, expanding the bathroom into her walk-in closet and creating a clean, modern monochromatic space. “I had no idea of how to start,” she said. She posted her project on Sweeten, a free service matching renovators with vetted general contractors, and was matched with this general contractor. She learned that she wasn’t going to be able to relocate the toilet, so she decided to just keep the original layout and focus on creating a “beautiful and functional space” with lots of storage in the form of a two-drawer vanity, vanity mirror, and open shelving. The most exciting change? “Radiant floors, which are heaven,” she said.

SWEETEN Sari Resnick Bathroom02SWEETEN Sari Resnick Bathroom03

Sari loves to watch “Fixer Upper” and other home renovation shows. That’s where she got the idea of a pocket door “so I could use the wall space that had been covered up by the original bathroom door.” It’s a perfect place for a towel bar and hooks. “It makes the space feel much larger,” she said, “especially because the door is rarely closed,” since she lives alone with her pitbull Bruno.

Once the work began, Sari’s Sweeten contractor gutted the bathroom and found leaks coming from neighbors’ apartments above and next door. “That wasn’t fun and a bit stressful,” she said, “but building management fixed them, so we only lost one day during the renovation.”

SWEETEN-Sari-Resnick-Bathroom14

The biggest challenge was finding the tiles. “It was overwhelming and took me over a month,” said Sari, who originally wanted to do a black and white bathroom, but then decided to keep the color scheme in line with the apartment in case this is the only renovation she does. “I had no idea where to go or how to start, but my contractor was very helpful.” He told her where to purchase tile and granite, as well as wood for shelving. Then he picked up everything for her since, she said, “I’m a New Yorker and don’t have a car!” She also found it helpful to contact Sweeten’s client services, which answered her questions and directed her to their partner Build.com, where she purchased most of her fixtures. (“My sales representative there was terrific,” Sari said.)

SWEETEN-Sari-Resnick-Bathroom13SWEETEN Sari Resnick Bathroom06

Bonus: Now that Sari’s completed her first renovation, she has a few tips for those heading into a bathroom remodel: make note of where your towel bars are and where they should be so that they are at a comfortable height. Also, make sure you know which side of the toilet you want your flusher to be located because you can’t change that.

Style finds: Basalto honed penny round shower floor tile; wall tile; and Micron Series 2.0 in matte Nero floor tile: Galactic Tiles. Hardware: Kohler. Purist Series shower fixtures: Kohler. Happy D2 sink vanity: Duravit. Sans Souci wall-mounted toilet: Kohler. Vista 2 lighting: Cedar & Moss. Verdera Collection medicine cabinet: Kohler.

SWEETEN-Sari-Resnick-Bathroom15

Meg and Brett’s master bath has some serious storage, including a floor-to-ceiling built-in cabinet with beautifully organized shelves.

Refer your renovating friends to Sweeten and you’ll both receive a $250 Visa gift card when they sign a contract with a Sweeten general contractor.

Sweeten handpicks the best general contractors to match each project’s location, budget, and scope, helping until project completion. Follow the blog for renovation ideas and inspiration and when you’re ready to renovate, start your renovation on Sweeten.

The post A Bathroom Desperately Seeking Storage appeared first on Sweeten Blog.

A Co-op Reno Designed to Fit

$
0
0

Olivia and Greg take on a refresh with no time to spare

home renovation Manhattan

Olivia and Greg were expecting their first child when they began the remodel on their 1,300-square-foot co-op in a classic Upper West Side prewar building. Olivia, a journalist, and Greg, a lawyer, thought the neighborhood would be perfect for kids with its beautiful parks, play areas, and museums. The apartment had great details—large windows, plenty of light, built-in bookshelves, and nice moldings—but needed a serious refresh.

They posted their project on Sweeten, a free service matching homeowners with vetted contractors, and found the right contractor to create the contemporary look they were after. They wanted to update the kitchen and a bathroom—which later became both bathrooms—with new tiles and fixtures, plus enlarge the master bathroom. In the master bedroom, they needed a brand new built-in closet. But the pressure to finish before their baby’s birth added an extra layer of stress and it all came down to the wire.

home renovation Manhattanhome renovation Manhattanhome renovation Manhattan

Their previous kitchen in the West Village was small and they were excited to trade up to the larger space in their new home. Pipes in the walls made it difficult to move anything, so to keep costs down, they kept the same footprint. The existing kitchen cabinets were a mismatched black-and-white assortment, and Olivia imagined her dream space as a modern, all-white kitchen. They decided to reface most of the cabinets, painting them white with new hardware. The cabinets above the sink didn’t correctly fit the space, so custom cabinetry was crafted for the uppers as well as the lower cabinetry in the midsection of the kitchen, where pots and pans used to hang. There, another piece was designed to fit the space better with more storage built above, featuring glass doors to display their wedding china and glassware.

home renovation Manhattanhome renovation Manhattan

The shower was so tiny, Olivia said, By the middle of my pregnancy, I could barely fit in it!

home renovation Manhattan

Since the couple loves to cook and are big cookbook collectors, they created a nook to display some of their favorites. They kept the appliances, which were brand new. For the floors, porcelain tile resembling dark wood that was more durable and stain-resistant replaced the old red tile. “Definitely a plus with a new baby,” Olivia said. Now, the wood look matched the rest of the apartment.

home renovation Manhattan
(Above) Before of the master bathroomhome renovation Manhattan

Both bathrooms were outdated. In the master bath, the shower was so tiny, Olivia said, “By the middle of my pregnancy, I could barely fit in it!” The fixtures were old and the shower floor was plastic rather than tile. They really wanted a larger, more luxurious master bath and their dream was to have double vanities. To achieve this, they took space from an existing hallway and a closet in the master bedroom.

home renovation Manhattan

Their Sweeten contractor was able to design a seat in the shower to look like it was floating, sizing it just right so it wouldn’t take up too much space. “We wanted something that looked good but was also functional so that I could shave my legs and relax during a hot shower,” Olivia said.

home renovation Manhattan
(Above) Guest bathroomhome renovation Manhattanhome renovation Manhattan

They ended up adding the guest bathroom about two months into the project—it was not in the original budget. “I ended up convincing Greg that if we didn’t update it now, it would never get done, especially with the baby coming when we would be very preoccupied,” Olivia said. “Our contractor was able to work with us to get it done in a cost-effective and timely manner.”

The walls were painted dark gray in stark contrast to the bright white vanity and shower subway tiles. Olivia was inspired by the restaurant Union Fare in Union Square and wanted to replicate the style. “The contractor initially thought we were crazy,” she said, “but he ended up liking it.”

home renovation Manhattan
(Above, inset) Before of the master bedroom closet wallhome renovation Manhattan

To replace the lost closet in the master bedroom, their contractor created an envy-inducing new unit from California Closets. He was meticulous in his measuring to make sure that they could still have a king-sized bed, two nightstands, and closet doors that wouldn’t open up into the bed.

Designwise, they wanted adequate space for the two of them to hang clothes and for well-spaced shelving to fit items like sweaters. “I’m also pretty short,” Olivia said, “so we had to make sure that the hanging bar was low enough that I could still access my dresses and sweaters. The closets are amazing and really feel like a huge luxury.”

As if remodeling isn’t stressful enough, the pressure to stay on schedule was ever present. They moved out during the renovation. “We had tools and dust littering the baby’s nursery just two weeks before Olivia’s due date, which definitely made us all nervous,” Greg said. Luckily, their Sweeten contractor was extremely responsive to them any time of day. “As first-time homeowners, we had a million questions, and he couldn’t have been nicer and more professional to deal with,” Olivia said. “He also has an incredible eye for design, so we didn’t need to hire an outside designer to help us make decisions for items like the backsplash or tiles.” They shared their Pinterest boards and their contractor pulled materials matching their inspiration.

Even as newbies, though, the couple had faith in the process. They learned to be patient and to check up on the work as often as they could to get in front of any problems. They discovered that “renovating can be addicting! Once you start, you’ll begin to realize all the imperfections in your home which could add on tens of thousands of dollars to your project,” said Olivia. “But don’t get distracted. Stick with the original plan; you can always renovate again at another point.” In the end, it all worked out. The renovations were done in early December and Max was born the day after Christmas.

Thank you, Olivia and Greg, for sharing your home with us!

KITCHEN RESOURCES: Kitchen: Cabinet hardware: Richelieu. Sink/Faucet: Vigo. Stove: Wolf. Fisher & Paykel dishwasher and refrigerator: Designer Appliances.

MASTER BATHROOM RESOURCES: Shower temperature knob: Grohe. Showerhead: Delta. Toilet: Toto. Sconce lighting: Pottery Barn. White Dove paint color: Benjamin Moore.

GUEST BATHROOM: Toilet: Toto. 251 First lighting above medicine cabinet: Bellacor. Coachman’s Cape (walls) and Simply White (trim and ceiling) paint: Benjamin Moore.

MASTER BEDROOM: Cabinet closets: California Closets.

This couple in Morningside Heights added side-by-side built-in wardrobes to their master bedroom.

Refer your renovating friends to Sweeten and you’ll both receive a $250 Visa gift card when they sign a contract with a Sweeten general contractor. 

Sweeten handpicks the best general contractors to match each project’s location, budget, and scope, helping until project completion. Follow the blog for renovation ideas and inspiration and when you’re ready to renovate, start your renovation on Sweeten.

The post A Co-op Reno Designed to Fit appeared first on Sweeten Blog.

Front Doors for a Warm Welcome

$
0
0

Stepping up the entry door’s function, style, and security

front door
Nazli and Larry’s brownstone renovation

First impressions make lasting impressions, and this is as true of your home as it is of anything else in life. Let’s begin with the front door. It’s the focal point of your entry and the feature upon which pretty much everything else hinges—literally. You can go dramatic or understated, but you want a door that works with the style of your house while also keeping it secure and free from drafts. The right choice will set you well on your way to the kind of curb appeal that also gives a boost to the value of your home.

There’s plenty to choose from and plenty to consider when making your selection. Sweeten, a free service matching homeowners with vetted general contractors, offers a rundown of doors—materials, style, accessories, and add-ons—to help you navigate the process.

Why upgrade?

In short, security, energy efficiency, and good looks. The appropriate door performs on many levels. It’s also a good investment. The National Association of Realtors advises that homeowners can expect as much as an 80 percent return on window and door upgrades at closing. If you’re not moving, this enhancement makes you a better neighbor and a happier homeowner with a prettier front entrance. Prices can range from $200 up to $2,000+ if you add on sidelights, transoms, or different finishes.

You can also seize the opportunity to upgrade security with a new and more secure lock system and, if necessary, an energy-efficient door that reduces air leakage, thus trimming utility costs.

Finding your style

The choice, of course, is yours, and you can have whatever you want—windows or a solid panel, sidelights, or a transom. For the most winning curb appeal, you will want to stick with a door that fits with the architecture of your dwelling. Today’s houses, particularly new construction, can often be a hybrid that includes features from different eras—for example, Tudor plus French Revival or Spanish Colonial plus Craftsman. Consult with a professional, such as an architect, your contractor, or a sales rep with a door company who has experience pairing the right door with a particular house style. You can also find architectural home styles online, including on manufacturers’ websites, and compare what you find with your home. Therma-Tru Doors offers the DoorWays app, which allows you to try out different doors on an image of your own front entrance.

front door
Exterior renovation by Sweeten contractor Richard

Door systems and configurations

You’ll find that entry doors are often referred to as “door systems,” which means they come not as a mere rectangular slab but pre-hung in a frame and pre-drilled for both doorknob and deadbolt. The system should also include the door’s bottom edge, which interlocks with the threshold, and most likely weather stripping encircling the door’s perimeter. This is not only convenient but also sensible. You want to purchase all the door features from one manufacturer to ensure everything functions well together.

If you’re replacing an existing door, you will want it to be the same size as the previous one, unless you are taking apart the entire entryway for a dramatic change. Changing the dimensions of the door or adding sidelights or a transom involves reframing the opening, and you will need a contractor to perform this job. Consult with your own contractor before committing to a particular door to be certain the door will fit before it is paid for and delivered.

Other terms you’ll encounter are “flush” and “paneled.” Flush doors are flat and smooth on both faces. Paneled doors have rectangular recesses framed by horizontal rails and vertical stiles. The original purpose of panel construction was to minimize cracking and warping on wood doors by giving the panels room to shift with changes in humidity. The “look” caught on, and it can be found in other door materials.

Material choices

When you see the word “door,” you may automatically think “wood.” However, there’s more to materials nowadays, including fiberglass, steel, and wood composites. In each of these categories, doors are typically made of more than one material. Other materials are incorporated to enhance stability and energy efficiency. A wood door may have a steel interior, a steel door may have a wood exterior, a fiberglass door may have a wood frame—all for stability and strength—and most will have some type of foam insulation to fill the interior voids.

Each of the materials has its pros and cons, and the versatility to achieve different styles, configurations, and finishes, including the look of woodgrain.

Fiberglass

Pros: A practical choice for most climates, particularly harsh or humid, fiberglass doors resist wear and tear extremely well. Available in smooth or embossed woodgrain texture, they can mimic the look of wood and take paint or stain. Dent-resistant and requiring little maintenance, these doors typically come with a long warranty, from 20 years to limited lifetime.

Cons: Can crack under severe impact.

Price range: $200 – $1,500

Steel

Pros: Positioned as the strongest of doors, steel will not crack or warp. Coated with a baked-on polyester finish, this door will require periodic repainting. Higher-end versions come with a vinyl finish for greater weather resistance. Some manufacturers offer a wood veneer or wood composite coating that can be stained.

Cons: Not as weather-resistant as fiberglass or wood doors. Easy to dent, dings are hard to fix, and scratches may rust if not treated promptly. In extremely high temperatures, the surface can be hot to the touch.

NOTE: Both steel and fiberglass doors should come with a thermal break that separates the inside and outside door skins. This prevents transference of outdoor heat and cold, which can cause frost to form on the inside surface.

Price range: $200 – $2,000

Wood

Pros: This natural material still has its fans who are drawn to its heritage of warmth and the versatility of different species. Wood resists cold and heat. Some wood doors are composed of a veneer skin over an engineered wood core to protect from moisture that causes shrinking, swelling, and warping. It’s also the least likely material to dent and scratches are easy to repair.

Cons: Solid doors can be made through a millwork shop, lumberyard, and some door manufacturers, but they are expensive and time-consuming to complete. They also require regular upkeep—painting or varnishing to maintain their appearance—and a protected area in the shade or under an overhang.

Price range: $175 – $2,600

Decorative details

The hardware—hinges, door handle—while practical, also complement your door style. Manufacturers will offer further options for customization with decorative glass, grilles, metal trim, and clavos (aka, decorative door studs). Sidelights and/or a transom also lend visual interest while ushering in more light. There’s plenty of choice within the glass category too—clear, rain, satin, and geometric to name a few. And don’t forget the door knocker, even if you have a doorbell!

Color considerations

A contrasting or complementary door color adds a touch of wit and drama to the entry. Try matching it to the window frames or shutters, if you have them, for a truly coordinated look. Or just go for it with one bold color for the door. Many manufacturers offer color as part of the door selection process, saving you the trouble of painting, and these finishes are formulated to be fade resistant.

Picking the right front door can feel like a big commitment, and it is. But as with all the right relationships, it’s one that you can depend on and enjoy for many years.

Just as a front door makes a lasting impression on everyone who enters, interior doors—whether they stand out or blend in with their surroundings—impact the overall design of your home.

Refer your renovating friends to Sweeten and you’ll both receive a $250 Visa gift card when they sign a contract with a Sweeten general contractor.

Sweeten handpicks the best general contractors to match each project’s location, budget, and scope, helping until project completion. Follow the blog for renovation ideas and inspiration and when you’re ready to renovate, start your renovation on Sweeten.

The post Front Doors for a Warm Welcome appeared first on Sweeten Blog.

Viewing all 1836 articles
Browse latest View live